Git的一些使用说明#
Git的一些使用说明#
🎯 项目白皮书#
- 此文档,主要的受众是 Git 的中高阶使用者
一、高频实用命令 🔼 🔽#
1、👀查看@当前仓库 🔼 🔽#
git remote                 # 只看名字
git remote -v              # 名字 + URL(fetch/push)
git remote get-url --all origin     # 只看 origin 的所有 URL
git remote show origin              # 详细信息(默认分支、跟踪分支等)
git remote show -n origin           # 同上但不连网
git config --get remote.origin.url  # 只取一个 URL
2、👀查看@所有子模块一起看(含嵌套) 🔼 🔽#
git submodule foreach --recursive 'echo "[$name]"; git remote -v; echo'3、👀查看@针对某个子模块目录 🔼 🔽#
git submodule foreach --recursive 'echo "[$name]"; git remote -v; echo'4、修改 🔼 🔽#
git remote add origin <url>                # 添加
git remote set-url origin <new-url>        # 改 URL
git remote rename origin upstream          # 改名
git remote remove origin                   # 删除
二、进阶使用必修 🔼 🔽#
1、什么是变基(rebase) 🔼 🔽#
变基(rebase)是 Git 中的一种操作,用于在改变分支基础(即分支的起点)的同时,将提交历史重新应用到新的基础上
变基的主要作用是使提交历史更加线性和整洁,特别是在处理分支合并和多分支协作时
1.2、变基的基本概念 🔼 🔽#
假设我们有以下提交历史:
A---B---C---D  (main)
     \
      E---F---G  (feature)
如果我们想将 feature 分支变基到 main 分支的最新提交(即 D),可以使用以下命令:
git checkout feature
git rebase main
变基操作会重新应用 feature 分支上的提交(E、F、G),使它们基于 main 分支的最新提交(D),结果如下:
A---B---C---D  (main)
              \
               E'---F'---G'  (feature)
1.3、变基的优点 🔼 🔽#
- 保持提交历史线性:变基可以消除合并提交,使历史记录看起来更加整洁和直观
- 简化日志查看:线性的提交历史使
git log更容易阅读和理解 - 冲突处理集中:变基过程中处理冲突一次性解决,而不是在合并时处理多次冲突
1.4、变基的缺点 🔼 🔽#
- 改变提交哈希:由于变基重新应用提交,原有提交(E、F、G)的哈希会改变。这意味着变基后的提交(E’、F’、G’)和原来的提交是不同的
- 协作冲突:如果变基的分支已经被推送到远程仓库,其他开发者基于这些提交工作后进行变基,可能会引起混乱和冲突
- 不可逆性:变基操作对历史进行了重写,尤其在共享分支上使用时,需要特别小心
1.5、变基的用法 🔼 🔽#
变基到另一个分支:
git checkout feature
git rebase main
交互式变基(修改、重排、合并提交):
git rebase -i main使用交互式变基可以更精细地控制每个提交的变基过程。
解决冲突后继续变基: 如果变基过程中发生冲突,可以手动解决冲突,然后使用以下命令继续变基
git rebase --continue中止变基: 如果变基过程中遇到问题,想要取消变基,可以使用:
git rebase --abort
2、🍒遴选(cherry-pick) 🔼 🔽#
形象比喻👉
cherry-pick:摘樱桃🍒
git cherry-pick是https://git-scm.com/ 中的一条命令,用于将某个(或多个)特定提交的更改从一个分支复制到另一个分支- 与普通的合并或变基操作不同,
cherry-pick是选择性地提取单个提交 - 这在需要将某些特定更改应用到另一个分支时非常有用,而不必合并整个分支的所有更改
2.1、基本用法 🔼 🔽#
假设我们有以下提交历史:
A---B---C---D  (main)
     \
      E---F---G  (feature)
现在,我们想把
feature分支上的提交F应用到main分支上。我们可以使用git cherry-pick来完成这个操作1.1、操作步骤 🔼 🔽#
切换到目标分支(即你希望将提交应用到的分支):
git checkout main执行
cherry-pick命令,将特定提交应用到当前分支:git cherry-pick <commit-hash>在这个例子中,如果我们要将
F提交应用到main分支,我们可以这样做:git cherry-pick <hash-of-F>
1.2、示例 🔼 🔽#
假设我们有如下的提交历史,并且提交
F的哈希是abc123:git checkout main git cherry-pick abc123执行完上述命令后,
main分支的提交历史将变为:A---B---C---D---F (main) \ E---F---G (feature)git add <resolved-files> git cherry-pick --continue
1.3、解决冲突 🔼 🔽#
如果在执行
cherry-pick时遇到冲突,Git 会暂停操作并提示你解决冲突。你需要手动解决冲突,然后使用以下命令继续:git add <resolved-files> git cherry-pick --continue如果你想中止
cherry-pick操作,可以使用:git cherry-pick --abort
1.4、🍒批量遴选 🔼 🔽#
可以一次性
cherry-pick多个提交,使用以下命令:git cherry-pick <commit-hash-1> <commit-hash-2> ...或者使用提交范围:这将
cherry-pick从start-commit-hash之后到end-commit-hash的所有提交。git cherry-pick <start-commit-hash>..<end-commit-hash>
1.5、注意事项 🔼 🔽#
- 提交历史变更:
cherry-pick会创建新的提交,并且新提交的哈希与原来的不同 - 适用于单独更改:当你只需要将某些特定更改应用到另一个分支时,
cherry-pick非常有用。如果需要合并整个分支的更改,使用merge或rebase可能更合适 - 冲突风险:与所有涉及代码合并的操作一样,
cherry-pick也可能导致冲突,特别是在目标分支有不同更改的情况下 git cherry-pick是一个强大的工具,允许你选择性地将特定提交从一个分支复制到另一个分支。它在处理特定修复、功能或更改时非常有用,但在使用时需要注意冲突和提交历史的变更
三、Git的配置文件config 🔼 🔽#
Git 的配置文件
.git/config存储了关于该仓库的配置信息该文件是纯文本文件,使用 INI 格式
[core] repositoryformatversion = 0 filemode = true bare = false logallrefupdates = true ignorecase = true precomposeunicode = true [remote "Jobs.Office"] url = https://git.betzz.cc/fm_ios/fm.ios.git fetch = +refs/heads/*:refs/remotes/Jobs.Office/* [remote "Jobs.Github"] url = git@github.com:295060456/JobsOCBaseConfigDemo.git fetch = +refs/heads/*:refs/remotes/Jobs.Github/* [branch "main"] remote = Jobs.Github merge = refs/heads/main [pull] rebase = false[core]部分包含了一些核心配置选项,这些选项影响 Git 的基本行为- repositoryformatversion: 指定仓库的格式版本。默认值是 0
- filemode: 指示 Git 是否追踪文件的可执行权限(即是否追踪文件的权限变化)。如果设置为
true,Git 会记录文件权限的变化 - 表示该仓库是否是裸仓库。裸仓库是没有工作目录的仓库,通常用于远程存储
- logallrefupdates: 如果设置为
true,Git 会记录所有引用(refs)的更新情况 - ignorecase: 表示是否忽略文件名的大小写。在不区分大小写的文件系统上应设置为
true - precomposeunicode: 在 MacOS 上,用于处理 Unicode 正规化问题。设置为
true以解决文件名在不同环境下显示不一致的问题
[remote]部分定义了远程仓库的信息。可以有多个[remote "<name>"]部分来定义多个远程仓库- url: 远程仓库的 URL 地址
- fetch: 指定从远程仓库拉取哪些引用(refs)。
+refs/heads/*:refs/remotes/<remote>/*表示拉取所有分支并在本地创建相应的远程跟踪分支
[branch]部分定义了分支的配置信息,主要包括跟踪的远程分支- remote: 指定分支关联的远程仓库名
- merge: 指定分支关联的远程分支。当执行
git pull或git merge时,会合并此远程分支的更改
四、切换分支 🔼 🔽#
1、期望将高亮的此分支用作主分支 🔼 🔽#
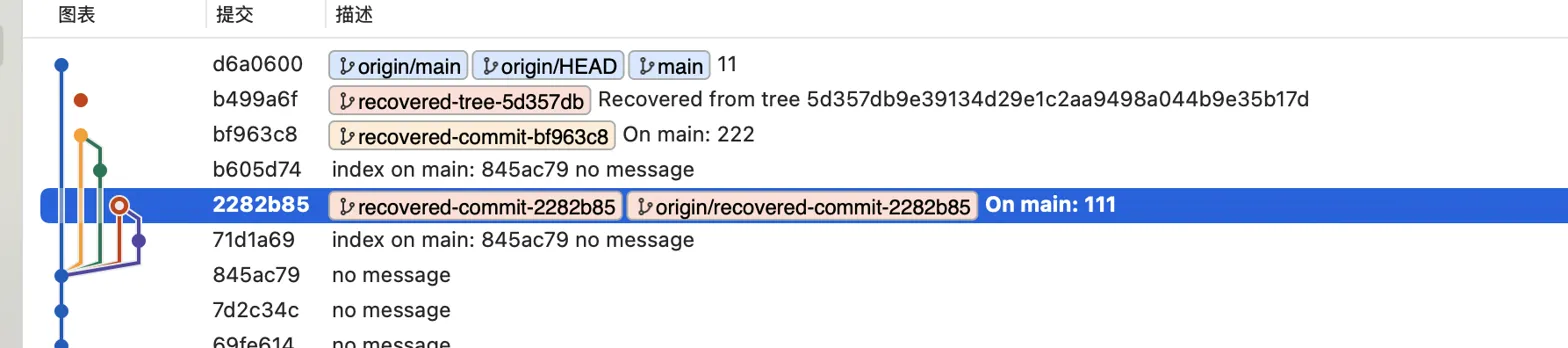
方法一:强制推送(如果是个人仓库或团队同意)
# 先切换到目标提交
git checkout 2282b85
# 强制更新 main 分支指向这个提交
git branch -f main 2282b85
# 切换到 main 分支
git checkout main
# 强制推送到远程(注意:这会重写远程历史,需要远程服务器开放回滚权限)
git push origin main --force
方法二:创建新分支替代
main(更安全)# 基于目标提交创建新分支 git checkout -b new-main 2282b85 # 推送新分支 git push origin new-main # 在 GitHub/GitLab 等平台上将 new-main 设为默认分支 # 然后删除旧的 main 分支 git push origin --delete main git branch -D main # 重命名本地分支 git branch -m new-main main方法三:
Reset方式(如果你在main分支上)# 确保在 main 分支 git checkout main # 重置到目标提交 git reset --hard 2282b85 # 强制推送 git push origin main --force
2、切分支找源头 🔼 🔽#
git show --no-patch --pretty=%P 这里写ID 五、误删除本地已储藏的恢复原理和方案 🔼 🔽#
在 SourceTree 中,如果你 误删了已储藏的变更(stash),恢复的可能性取决于你是否还有相关的 Git 记录尚未被垃圾回收(Git GC);
如果此记录已经被提交到远程服务器,那么本地的Git将会清除垃圾,从而找不到误删的记录;
git fsck --lost-found# 类似如下的输出 dangling commit abcdef1234567890...# 查看该 dangling commit 的内容 git show abcdef1234567890# 确定需要恢复: # 这会创建一个新分支,把你的 stash 内容恢复出来。 git checkout -b recover-stash abcdef1234567890脚本执行
#!/bin/zsh

# 红色提示:确保脚本与 .git 文件夹在同一目录
echo "\033[31m确保该脚本与 .git 文件夹在同一目录下!\033[0m"

# 检查是否存在 .git 文件夹
if [ ! -d ".git" ]; then
  echo "❌ 错误:未在 Git 仓库根目录下运行。请确保此脚本与 .git 文件夹位于同一目录。"
  exit 1
fi

echo "🔍 正在查找所有 dangling 对象..."
git fsck --lost-found > .fsck_temp

current_branch=$(git rev-parse --abbrev-ref HEAD)
echo "✅ 当前分支:$current_branch"

mkdir -p recovered/blobs

# 恢复 commits(合并为未提交状态)
cat .fsck_temp | grep 'dangling commit' | cut -d ' ' -f 3 | while read commit_sha; do
    branch_name="recovered-commit-$commit_sha"
    echo "🔄 恢复 commit $commit_sha 为临时分支 $branch_name"
    git branch $branch_name $commit_sha

    echo "⚙️ 合并 $branch_name 到 $current_branch(不提交)"
    git merge --allow-unrelated-histories --no-commit $branch_name
done

# 恢复 trees(包装为临时 commit 后合并,不提交)
cat .fsck_temp | grep 'dangling tree' | cut -d ' ' -f 3 | while read tree_sha; do
    commit_sha=$(echo "tree $tree_sha" | git commit-tree $tree_sha -m "恢复 tree $tree_sha")
    branch_name="recovered-tree-$tree_sha"
    echo "🌲 恢复 tree $tree_sha 为临时 commit:$commit_sha(分支 $branch_name)"
    git branch $branch_name $commit_sha

    echo "⚙️ 合并 $branch_name 到 $current_branch(不提交)"
    git merge --allow-unrelated-histories --no-commit $branch_name
done

# 恢复 blobs(保存在 recovered/blobs,已 add 但不 commit)
cat .fsck_temp | grep 'dangling blob' | cut -d ' ' -f 3 | while read blob_sha; do
    filename="recovered/blobs/$blob_sha.txt"
    echo "📄 恢复 blob $blob_sha 到文件 $filename"
    git cat-file -p $blob_sha > $filename
    git add $filename
done

rm .fsck_temp

echo ""
echo "✅ 所有内容已恢复并合并到当前分支(未提交)"
echo "👉 请手动查看变更,确认无误后再执行 commit"
六、实操案例 🔼 🔽#
1、同一个文件夹(文件内容相同),但是来自于2个不同的远程仓库 🔼 🔽#
fatal: refusing to merge unrelated histories 表明正在尝试合并两个没有共同提交历史的分支
要解决这个问题,你可以使用
--allow-unrelated-histories选项来强制 Git 合并这两个独立的历史记录git --no-optional-locks -c color.branch=false -c color.diff=false -c color.status=false -c diff.mnemonicprefix=false -c core.quotepath=false -c credential.helper=sourcetree fetch Jobs.Office From https://git.betzz.cc/fm_ios/fm.ios * [new branch] main -> Jobs.Office/main git --no-optional-locks -c color.branch=false -c color.diff=false -c color.status=false -c diff.mnemonicprefix=false -c core.quotepath=false -c credential.helper=sourcetree pull --commit --rebase=false Jobs.Office main From https://git.betzz.cc/fm_ios/fm.ios * branch main -> FETCH_HEAD fatal: refusing to merge unrelated histories Completed with errors, see above分支分叉的问题。Git 需要指定如何合并分支
Last login: Wed Jul 17 10:27:35 on ttys000
➜  Desktop /Users/user/Desktop/q
➜  q git:(main) git pull Jobs.Office main --allow-unrelated-histories

From https://git.betzz.cc/fm_ios/fm.ios
 * branch            main       -> FETCH_HEAD
hint: You have divergent branches and need to specify how to reconcile them.
hint: You can do so by running one of the following commands sometime before
hint: your next pull:
hint:
hint:   git config pull.rebase false  # merge
hint:   git config pull.rebase true   # rebase
hint:   git config pull.ff only       # fast-forward only
hint:
hint: You can replace "git config" with "git config --global" to set a default
hint: preference for all repositories. You can also pass --rebase, --no-rebase,
hint: or --ff-only on the command line to override the configured default per
hint: invocation.
fatal: Need to specify how to reconcile divergent branches.
1.1、自动合并 🔼 🔽#
设置(本地仓库)合并策略为 merge
git config pull.rebase false或者
设置(全局所有仓库)合并策略为 merge
git config --global pull.rebase falsegit pull Jobs.Office main --allow-unrelated-histories
1.2、手动合并 🔼 🔽#
git fetch Jobs.Officegit merge Jobs.Office/main --allow-unrelated-histories
1.3、如果有冲突,解决冲突 🔼 🔽#
git add .
git commit -m "Resolve merge conflicts"
1.4、同步远程仓库 🔼 🔽#
git push Office main2、实操总结 🔼 🔽#
远程空仓库有2种方式:
(直接推送)直接本地获取到仓库地址,直接本地发起push同步。如果本地仓库是新创建的,那么之前的远程的历史记录将不会存在
更适合于:
新创建的本地仓库准备推送到一个空的远程仓库
已有完整代码的本地仓库初次设置远程仓库地址并进行首次推送
(先拉取再推送)远程仓库pull以后,本地同步以后,再同步远程仓库
- 更适合于:
- 需要确保本地仓库和远程仓库一致性
- 多人协作开发的项目,确保所有开发者都能获取最新的远程仓库状态
- 需要保留和获取远程仓库的完整历史记录和分支信息
- 更适合于:
即便是文件内容一致,也需要进行同步(分支等)
上述问题是因为虽然本地文件和远程仓库文件一致(没有什么需要合并的冲突),仅仅是没有共同提交历史
如果是远程仓库已经存在代码,需要和本地仓库进行匹配,就会遇到上述问题
如果是远程仓库为新建的空仓库,那么可以本地通过配置git.config的方式进行(
.git是隐藏文件夹)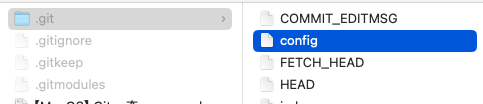
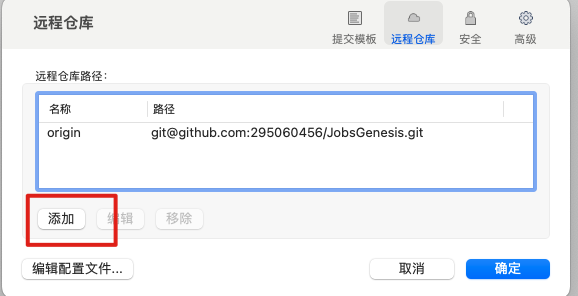
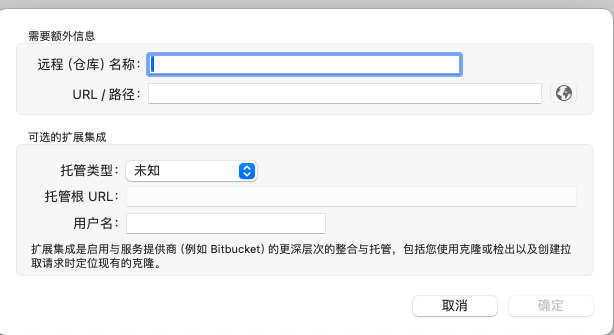
- 或者通过第三方的Git.GUI软件,进行添加设置(这里以sourcetree为例)